It’s a well known fact that Star Wars was the first major media franchise to leverage merchandising as part of its marketing. If you were a kid growing up in the 70’s, it was impossible to escape the ubiquity of Star Wars toys: Kenner action figures, vehicle play sets, plastic space guns, Coca Cola glasses, lunchboxes, pencil cases… on and on.
As a 90’s kid we experienced this all over again with the re-release of the original Star Wars special editions in theaters, and then with the prequel trilogy a few years later. The toys reappeared as well and with all new tie-ins. There were Star Wars walkie-talkies, Monopoly games, Happy Meal toys at McDonalds… and there were Star Wars LEGO sets.
The LEGO sets were a novel concept. Up until their deal with Lucasfilm, LEGO sets were largely original concepts with their own themes. The Star Wars sets recreated scenes from the movies, let kids play with minifigs of their favorite characters, and introduced a whole host of custom bricks to make the sets as true to [LEGO-]life as possible. The most sought after of which was the LEGO lightsaber.
I’ve been feeling nostalgic lately, so I decided to show off my love for LEGO and Star Wars by making some LEGO lightsaber earrings!
Gathering Supplies
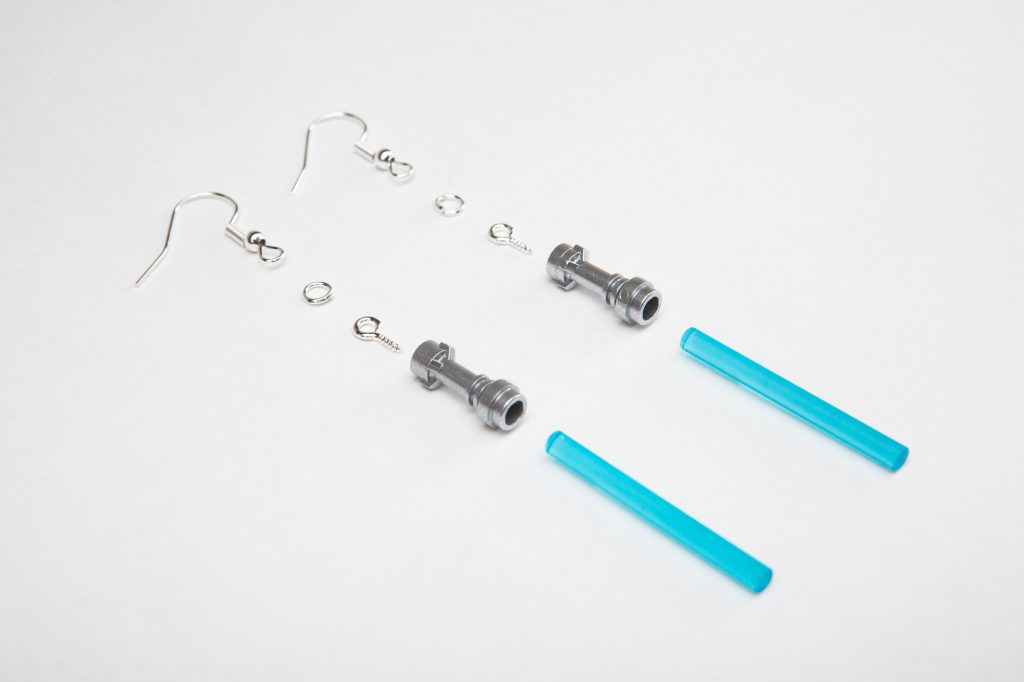
The first thing you’ll need are the LEGO lightsabers themselves. These come in two parts: the minifigure hilt and the smooth bar for the blade.
For my sabers I decided to use the classic metallic silver and black straight hilts with blades of transparent light blue (the “Skywalker” saber), transparent bright green (Luke’s saber), and transparent red (various Sith sabers). I ordered all parts used from a third party seller on BrickLink.com.
Of course you’ll also need the parts to convert the lightsabers to earrings! I used mini threaded eyelets to add a hook to the rear of the lightsabers. Then I bought an assortment of earring hooks, jump rings, and backings to complete the earrings.
Making the Earrings
There is no way to securely attach a ring to the bare lightsaber hilts, so the first thing I did was install a threaded eyelet. I used a 3 mm drill bit to mark a center point in the bottom of the hilt. Then, gripping an eyelet straight in a pair of needle-nose pliers, I applied firm pressure against the hilt while spinning it between my fingers. Once it had started to thread into the hilt I used the pliers to install it the rest of the way.
Installing the eyelet was the trickiest part of this project, and I lost a handful of hilts to the eyelet failing to thread or the thread tearing out. For next time I’d like to get some very small (~0.5 mm) drill bits to try pre-drilling the hole to make this process easier.
With the eyelet in place the rest of the project is easy. I used my pliers to twist a jump ring open, inserted the saber hilt and earring hook, then twisted it closed. The saber blades can be easily installed in the hilt and like all LEGO parts will stay in place with a friction fit, but to be on the safe side I added a small dab of cyanoacrylate glue to join the blade and hilt permanently.
For the two “light side” sabers I used metallic silver hilts with silver finish hardware, while for the “dark side” sabers I used black hilts with black painted hardware.
Gift Wrapping
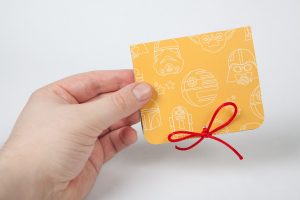
I created these earrings as gifts, so the final step was to create a nice backing / case to collect and present the three sets of finished earrings.
Using Fusion 360, I designed a “sheet metal” part with a flat bottom, angled sides, and a flip-up top. I exported the flat pattern as a DXF, customized it in Adobe Illustrator, and then cut the finished version on my Silhouette Cameo 3. I used Star Wars themed cardstock (~0.25 mm thick) for flair, and a small red ribbon to hold the assembly closed.
An Elegant Weapon…
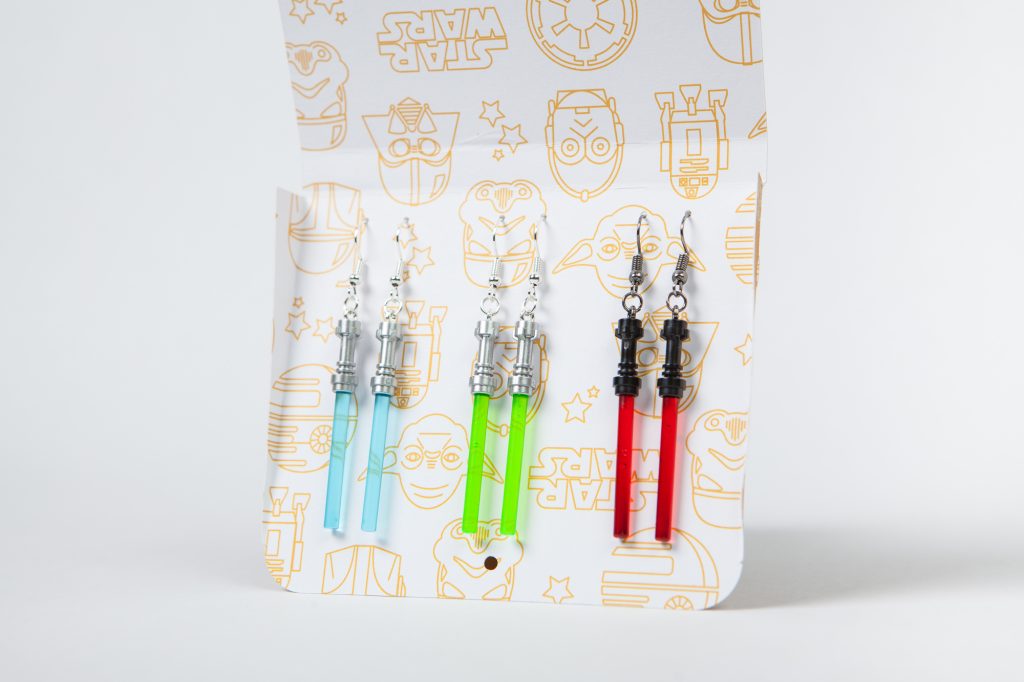
The earrings are done! And they look gorgeous. I’m very happy with how these turned out. They’re fun, nerdy pieces of jewelry and were a great weekend project.
Aside: LED Illumination
I did give some thought to making these light up. The body of the saber is 3.2 mm in diameter, so it’s theoretically possible to drill it out carefully and fit a small LED.
The problem I ran into was where to place the battery. There are LED-illuminated stud earrings that integrate the battery into the earring back, but those transmit power through the stud itself (using a sheath for the ground connection). That wouldn’t work for these since the sabers need to dangle.
There are also various PCB-based LED earrings that use a coin cell holder on the PCB (earring) itself. Again, that wouldn’t work here since the saber is so long and skinny.
The best idea I came up with was to buy some inexpensive behind-the-ear hearing aids, then modify them to remove the hearing aid electronics and redirect the battery to the LED. That would work but it would kill the thin aesthetic of the earring, which largely defeats the point.
Do you have any ideas for how to discretely power an LED version? Leave a comment below!
Parts List
Building a pair for yourself? Here is a comprehensive list of everything you’ll need:
Materials
- LEGO Minifigure Weapon Lightsaber Hilt Straight (#64567), Metallic Silver (#67)
- LEGO Minifigure Weapon Lightsaber Hilt Straight (#64567), Black (#11)
- LEGO Lightsaber Blade 4L (#30374), Transparent Light Blue (#15)
- LEGO Lightsaber Blade 4L (#30374), Transparent Bright Green (#108)
- LEGO Lightsaber Blade 4L (#30374), Transparent Red (#17)
- Mini Jeweler’s Eyelets, 1.1 mm Thread (Assorted Colors)
- Jeweler’s Earring Hooks and Jump Rings (Assorted Colors)
All LEGO parts use the Bricklink.com part IDs and color names / IDs.
Tools
Supplies
- Star Wars Cardstock Paper
- Cyanoacrylate glue (Optional)
These are Amazon Affiliate links that help fund the content on this site. As an Amazon Affiliate I earn from qualifying purchases. Thank you for your support!