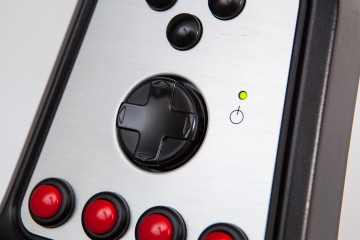
Enabling the Power LED on the G25/G27 Shifter

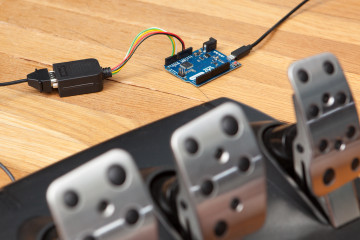
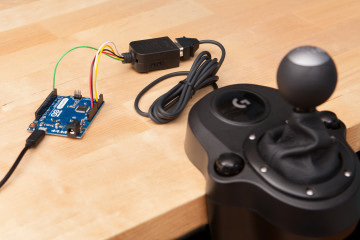
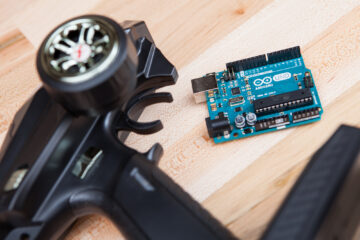
If you’ve followed my instructions to build a DIY USB adapter for your Logitech G25 or G27 shifter, you might have noticed something that may seem a little odd: the power LED doesn’t light up!

Don’t worry, nothing is broken and you haven’t done anything wrong – it’s normal that the power LED doesn’t turn on with these adapters. The power LED has its own pin, and since it’s not needed in order to read from the shifter I didn’t add it to the tutorial. But don’t fret! I can show you how to turn on the power LED, and even how to control it from the Arduino for some fun effects.

(more…)

How to Build a DIY Logitech G25 Shifter USB Adapter

Compared to a modern Logitech wheel, the Logitech G25 probably looks quite dated. Instead of covering the face of the wheel with inputs, the designers at Logitech opted to simplify the wheel itself and move most of controls to the attached shifter. In addition to its six gear H-pattern, the shifter has eight programmable action buttons, a directional pad, and the ability to transform into a sequential shifter. The modern Driving Force shifter, compatible with Logitech’s modern range of wheel bases, has the same shifting hardware but lacks these incredibly useful spare inputs. Unfortunately the shifter itself doesn’t have a USB output, which makes it difficult to use standalone without the matching wheel.

If you still have your Logitech G25 shifter, there is a way to get it working without a wheel. I’m going to show you how to build your own DIY USB adapter in under 15 minutes using only a handful of parts. This is an easy project and requires absolutely no soldering.

(more…)

How to Build a DIY Logitech G27 Shifter USB Adapter

Compared to a modern Logitech wheel, the Logitech G27 probably looks quite dated. Instead of covering the face of the wheel with inputs, the designers at Logitech opted to simplify the wheel itself and move most of controls to the attached shifter. In addition to its six gear H-pattern, the shifter has eight programmable action buttons and a directional pad. The modern Driving Force shifter, compatible with Logitech’s modern range of wheel bases, has the same shifting hardware but lacks these incredibly useful spare inputs. Unfortunately the shifter itself doesn’t have a USB output, which makes it difficult to use standalone without the matching wheel.

If you still have your Logitech G27 shifter, there is a way to get it working without a wheel. I’m going to show you how to build your own DIY USB adapter in under 15 minutes using only a handful of parts. This is an easy project and requires absolutely no soldering.

(more…)

How to Build a DIY Logitech Pedals USB Adapter

The new Logitech racing wheels come in two parts: the wheel “base” which contains the steering wheel proper, and an add-on peripheral with gas, brake, and clutch pedals. This pedal peripheral is quite well built with a metal frame, aluminum pedal faces, and user swappable springs. It even has mounting points for hanging the pedals upside-down or attaching them to a sim racing rig. Despite these perks, the pedals cannot function on their own – they must be plugged into the wheel base in order to work over USB. If you want to use these pedals with a different wheel setup, you need some sort of USB adapter.

I’m going to show you you can how to build your own DIY USB adapter for these Logitech pedals in under 15 minutes using only a handful of parts. This is an easy project and requires absolutely no soldering.

(more…)

How to Build a DIY Logitech Shifter USB Adapter

The Logitech Driving Force shifter is an awesome piece of kit. It’s small, stylish, robust, and inexpensive. But unfortunately it has one major drawback: it’s dumb! It has no “smart” electronics whatsoever, just a simple DB-9 connector that absolutely must be plugged into a Logitech wheel base unit in order to function. If you (like me) don’t happen to have a fancy Logitech racing wheel, you have to come up with some other way of connecting the shifter to your PC.

I’m going to show you you can how to build your own DIY adapter in under 15 minutes using only a handful of parts. This is an easy project and requires absolutely no soldering.

(more…)

How to Use an RC Controller with an Arduino

Whether you’re modifying a remote controlled vehicle or creating something completely new, Arduino boards are a great way to expand the functionality of your RC receiver. Adding a microcontroller lets you program complex logic functions, sound effects, lighting animations, and more – all managed from the comfort of a wireless remote.

In this tutorial I’m going to show you how to connect a PWM-based RC receiver to an Arduino and read data from it using the Servo Input library.

(more…)

How to Emulate an Xbox Controller with Arduino (XInput)

In my opinion, one of the more novel things you can do with an Arduino is put it to use as a custom game controller for your favorite games. Whether you’re retrofitting a Nerf gun, converting a rhythm controller to play an FPS game, or playing PUBG with a frying pan – using an Arduino makes it quick and easy to build your own custom controller.

In this tutorial, I’m going to show you how to program your own Arduino to emulate an Xbox controller using the ArduinoXInput library.

(more…)

How to Control the LEDs on a Novation Launchkey Mini II

I picked up a Novation Launchkey Mini II controller last year when I was working with those musical floppy drives, and recently I fell down the rabbit hole of Launchpad LED performance videos. That got me thinking: is it possible to control the LEDs on a Launchkey Mini like you can on a Launchpad?

There’s surprisingly little information about this. Novation’s user guide for the Launchkey Mini has no mention of how to control the LEDs. There is some information available in a “programmer’s reference” manual for the Launchkey II (not the “Mini” version), but sadly the LED components don’t function the same way.

It required a bit of reverse engineering and the result isn’t quite as pretty, but I’ve figured out how to do it.

(more…)